Facebook is one of the most popular marketing platforms on the planet, with an expansive advertising network that caters to businesses of all sizes. Do you know how to set up Facebook Ads so that you can get the most out of the algorithm, gain exposure and reach new audiences?
How to create a Business Manager:
Before creating ads, you need to set up a Facebook Business Manager and an Ad Account.
- Go to business.facebook.com/overview.
- Click ‘Create Account’.
Enter a name for your business, your name and work email address and click ‘Next’. - Enter your business details and click ‘Submit’.
How to create an Ad account
- Go to Business Settings.
- Click ‘Accounts’ from the left side menu. Then, click ‘Ad Accounts’.
- Click the blue ‘Add’ dropdown menu.
- Choose ’‘Create a new ad account’.
- Follow the prompts to select people and access levels.
Don’t forget to add your ABN number so you won’t need to pay GST (if you’re based in Australia), and make sure you verify your domain, and add your Facebook Pixel to your website. Installing the pixel will allow you to retarget any website visitors with ads, and track conversion actions within Facebook Ads Manager.
Setting up your Facebook Ad
Step 1: Setting up your ad objective
Start with the ultimate question “What outcomes do you expect from this ad?”. Choosing an objective will help clarify your goals for the upcoming campaign. The business objectives could be anything from increasing brand awareness, getting more enquiries or receiving more sales from your website.
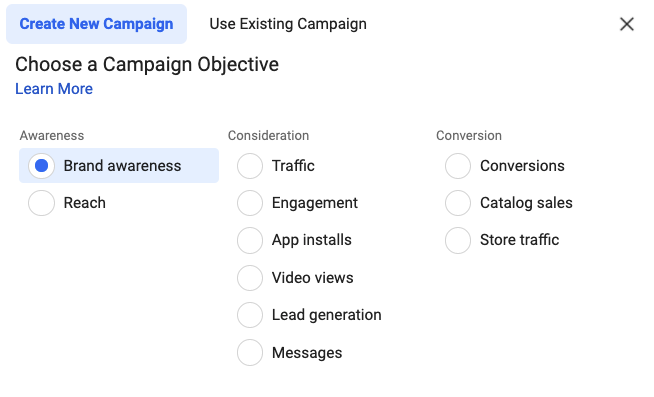
Tip: At first, your campaign may focus on building awareness, however, you may want to create a new campaign to encourage people to make a purchase or submit their contact details at a later stage.
Step 2: Decide on your target audience
Choose your desired demographics using what you know about the types of people you want to reach online, such as age, location, occupation, interests and many other details. Facebook will then display your ads to the people in these groups who are most likely to be interested in your ads or to purchase from your website.
In addition to these core audiences, you can create Custom and Lookalike Audiences.
Custom Audiences: Get back in touch with people who have engaged with your business, online or off, e.g. people who’ve visited your website or engaged with your Facebook Page content recently.
Lookalike Audiences: Reach new people whose interests are similar to those of your best customers, such as people similar to those who’ve purchased from you or visited your website previously.
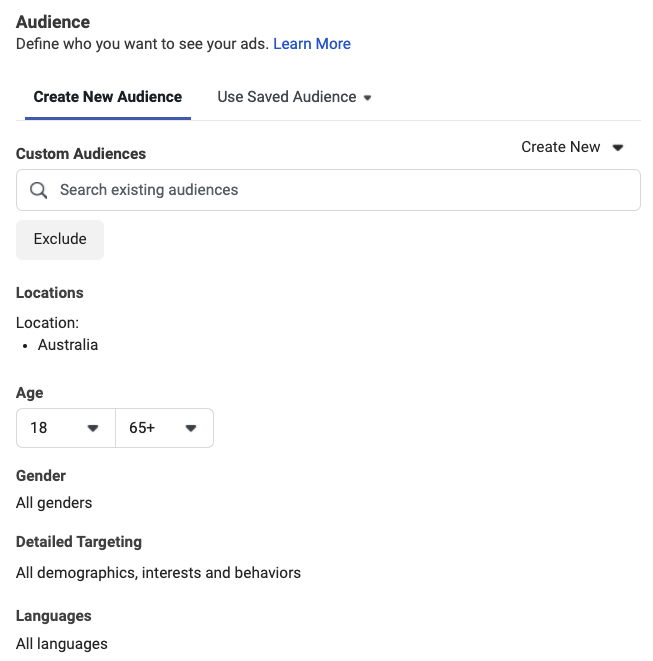
Tip: It’s often best to do a radius around your store, as that radius targeting helps you pinpoint specific locations rather than showing ads to entire regions such as NSW or Sydney.
Step 3: Choose your ad placements
This is when you choose where to run your ad, whether it is on Facebook, Instagram, Messenger or across all platforms. You can also decide to place your ads on specific mobile devices.
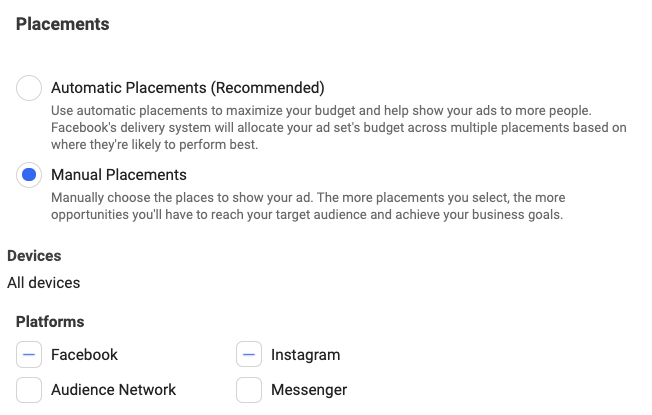
Tip: Not every placement works with every campaign objective. Sometimes, it’s a better idea to leave some out altogether.
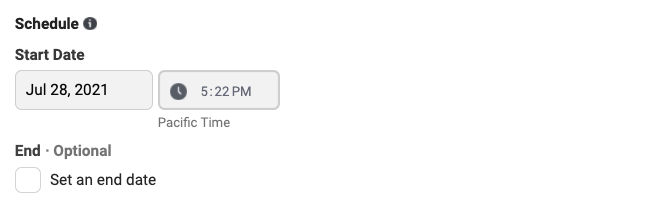
Step 4: Set your campaign budget and schedule
There are three main things to choose:
- Your budget type (daily or lifetime)
- How much you will spend (over a day or the entire campaign)
- The scheduled start and end date (if required) of your campaign

Tip: Make your campaign easier to manage by selecting a Daily budget instead of Lifetime. Otherwise, if your campaign is extended one or more times, each time you’ll need to add any new funds to what’s been spent in order to adjust the Lifetime spend. It can get messy!
Step 5: Pick a format for your ad
There are a total of six ad formats you can choose with Facebook Ads – they’re all designed to work on every device and connection speed. Whether you want to show a single image, a video or an entire slideshow – Facebook has you covered!
For each ad, write your copy and insert the relevant creative (e.g. image/s or video).

Tip: Target a different audience type in each Ad Set, so you can compare results. Plus, create 2-3 ad versions in each Ad Set for testing purposes. Pause ads that aren’t working, and create new versions based on those that are.
Step 6: Submit your ad
Submitting your ad is the final step of the campaign creation process. Once it’s up and running, you’ll be able to track your campaign’s performance and modify it in Facebook Ads Manager.
As well as tracking your results via Google Analytics (by using UTM parameters), you can set up Event tracking and Custom Conversions in Facebook Ads Manager, to enable you to more effectively optimise your campaigns and ads within this platform.
Congratulations on finishing setting up your first Facebook Ads campaign!
If you’d like some help, get in touch with us today, or find out more about our paid social media management options.